Washi Tape Geometric Patterns: Chevrons, Diamonds and Plaid
Five repeatable patterns built from straight strips, with the measurements and angles written out: even stripes, chevron, plaid, diamonds and triangle rows.

Tutorial at a glance
Materials
- White or pale cardstock
- Squared or dotted paper
- Non-stick backing paper or baking parchment
- Scrap paper for a 45-degree template
Every pattern on this page is built from one shape: a straight strip. What turns strips into washi tape geometric patterns is repetition at a fixed measurement, so the work is less about cutting skill and more about setting up a guide and then keeping to it. Five patterns follow, each with its geometry written out.
Set up: guides, backing paper and a mat
Three things make all five patterns easier.
- A guide. Work on squared or dotted paper where you can, or rule light pencil lines on plain card with a ruler. For 45-degree lines, fold a square of scrap paper corner to corner and use the folded edge as a template.
- Non-stick backing paper. The shiny side of a sticker backing sheet or baking parchment lets you stick tape down, cut it into shapes and lift the pieces off again.
- A cutting mat. Put the backing paper on a self-healing cutting mat and cut with a craft knife against a metal ruler, using light pressure. A craft knife is an adult tool. Clean cuts in general are covered in the guide to cutting washi tape with scissors or a knife.
Lift cut pieces with tweezers and press down only when the piece sits on its guide line.
Even stripes with a spacer strip
Stripes look geometric only when the gaps match, and a spacer is more reliable than measuring each gap.
- Lay the first strip along a ruled line and burnish it.
- Cut a spare strip of the tape whose width you want as the gap, and stick it lightly beside the first strip, edges touching. Do not press it down.
- Lay the second real strip against the other edge of the spacer.
- Peel the spacer away and move it to the next position.
A 15 mm strip with a 15 mm spacer gives equal bars and gaps. For diagonals, rule the first line at 45 degrees and the spacer keeps every later strip parallel.
Chevron from mirrored parallelograms
A chevron is a column of V shapes. Each V is two mirrored parallelograms meeting on a center line.
- Rule a vertical pencil line where the points of the Vs will sit.
- Stick a length of tape on backing paper. Make parallel cuts across it at 45 degrees, spaced about 1 in (2.5 cm) apart along the tape. Each piece is a parallelogram.
- Stick down a second length and cut it the same way with the cuts leaning the opposite direction. This matters: a left-leaning piece cannot be turned into a right-leaning one by rotating it, and flipping it over puts the adhesive on top.
- Place one piece from the first set with its short angled end against the center line, then a mirrored piece from the second set on the other side so the two angled ends meet in a point.
- Repeat down the line, using a spacer strip between rows, and change color every row or every second row.
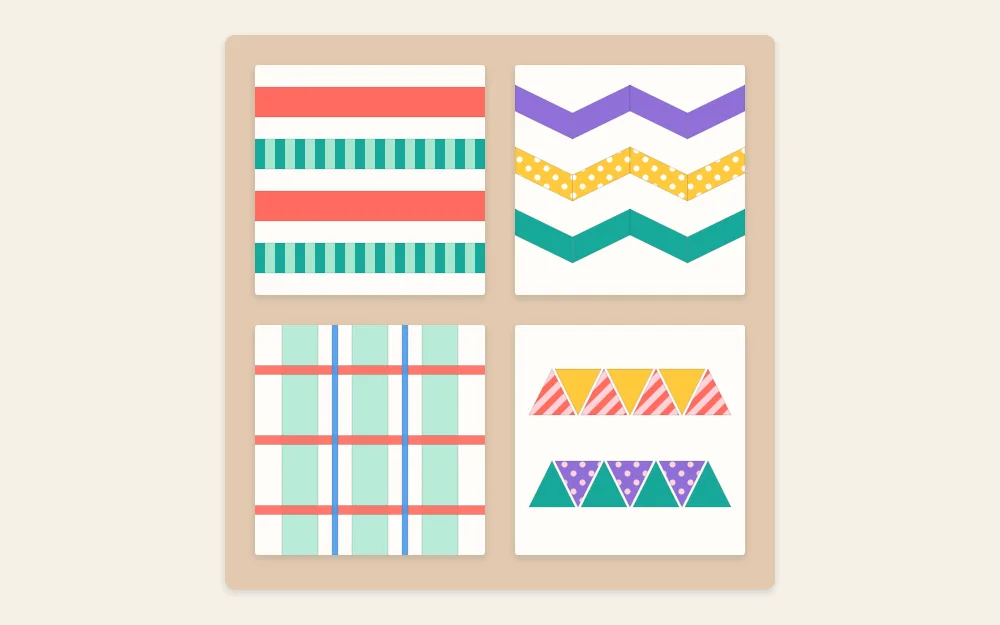
Plaid: wide one way, slim across
Plaid is two sets of stripes crossing at right angles. Washi tape is slightly translucent, so each crossing shows as a darker square, which makes plaid look woven.
- Lay wide or 15 mm strips in one direction, evenly spaced, with gaps about as wide as the tape. Burnish them.
- Lay slim strips of 3 to 7 mm across them at 90 degrees. Slim strips grouped in pairs look more like plaid than single lines.
- Press the slim strips down firmly where they step up and over the edges of the wide ones, since that is where they lift.
Choose a pale or mid-tone tape for the wide set and a darker one for the slim set. The guide to mixing tape colors and patterns explains how to pick them. Solids work better than prints here, because a print hides the darker crossings.
Diamonds: squares turned on point
Stick 15 mm tape on backing paper and cut straight across it every 15 mm, so each piece is as long as the tape is wide. Turn a square 45 degrees and it becomes a diamond.
The geometry to remember is the diagonal. A 15 mm square measures about 21 mm from point to point, so diamonds placed point to point in a row sit with their centers about 21 mm apart. Rule a pencil line, mark it at that spacing, and center a diamond on each mark with two points touching the line.
For a full harlequin field, add a second row offset by half a step, so each diamond drops into the notch between two diamonds above.
Triangle rows from alternating cuts
On tape stuck to backing paper, make a diagonal cut from the bottom edge up to the top edge, then the next cut leaning the other way, from the top edge back down to the bottom, and continue in a zigzag. Every piece between two cuts is a triangle, alternately pointing up and down.
The spacing decides the shape. On 15 mm tape, marking the top and bottom edges about every 17 mm, with the bottom marks offset by half a step, gives triangles with three nearly equal sides.

Place the triangles along a ruled line with their bases on it and a small even gap between them for a sawtooth border.
Which pattern for which surface
| Pattern | Pieces to cut | Guide needed | Suits |
|---|---|---|---|
| Even stripes | Full strips | One ruled line and a spacer | Any size, including large areas |
| Chevron | Two mirrored sets of parallelograms | Center line | Card fronts, cover panels |
| Plaid | Full strips in two widths | Grid or two ruled lines | Backgrounds, wrapped surfaces |
| Diamonds | Squares | Line marked at the diagonal spacing | Borders and narrow bands |
| Triangle rows | Triangles from zigzag cuts | One ruled line | Edges, headers, borders |
Scaling up and keeping it tidy
Start each pattern from the center of the area and work outward, so any drift is split between the two edges. Trim pieces that run past the edge of a card from the back, with the card face down on the mat.
Stripes and chevrons built from long strips also work on a wall. Walls need their own preparation and a patch test before any tape goes up, which is set out in the guide to applying and removing washi tape wall designs.
Erase pencil guides only after burnishing, and rub gently beside the tape, not across its edges.
Frequently asked questions
How do you cut washi tape into small shapes accurately?
Stick the tape onto non-stick backing paper, such as the shiny side of a sticker backing sheet or baking parchment, and place that on a cutting mat. Cut with a craft knife against a metal ruler using light pressure, then lift each piece with tweezers or the knife tip and move it to the project.
Why do the two halves of a tape chevron not match?
A chevron needs two mirrored sets of parallelograms, one cut with the blade leaning left and one leaning right. Pieces from a single set cannot be rotated into their mirror image. If both sets exist and the points still miss, the cutting angle has drifted from 45 degrees, so recut against a folded-paper template.
Which tape is easiest for geometric patterns?
Solid colors in the standard 15 mm width. Solids make the shapes read clearly, and a known width turns the tape itself into a measuring unit for squares and spacers. Busy prints hide the pattern and make directional mismatches obvious. Add one slim tape for plaid lines and thin accents.