How to Decorate a Notebook Cover With Washi Tape
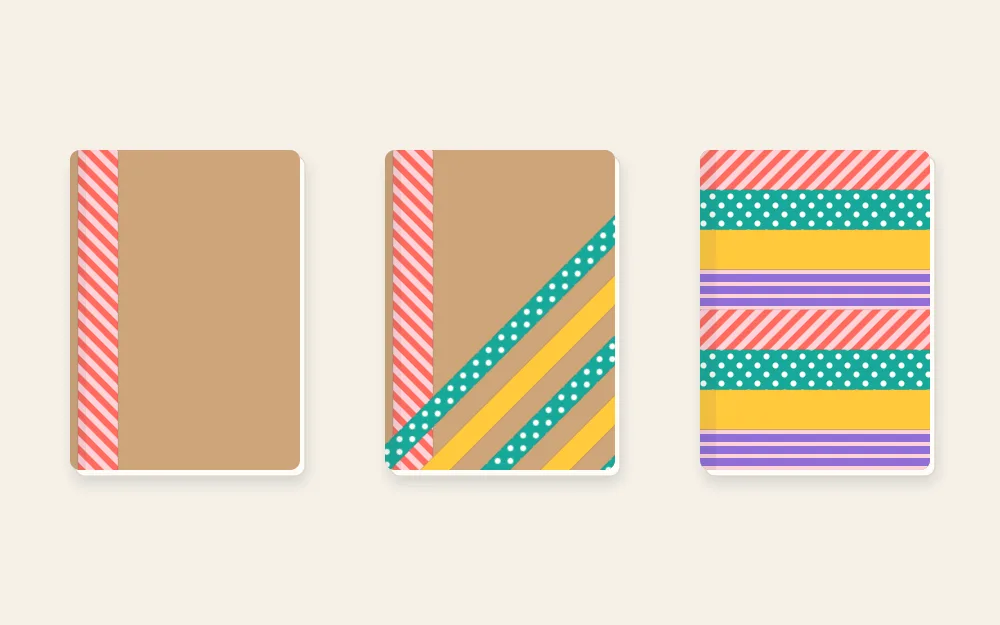
Three ways to dress a plain notebook: a spine strip with a corner accent, a diagonal stripe block, and full-cover stripes wrapped inside and hidden under a paper lining.

Tutorial at a glance
Materials
- Notebook with a plain cardboard or kraft cover
- Sheet of paper to line the inside cover
- Glue stick
- Small piece of white or cream cardstock for a label
- Clear self-adhesive film, optional
A plain notebook is one of the kindest surfaces for tape: flat, stiff and the right size for strips you can handle in one piece. A washi tape notebook cover can be a two-minute spine strip or a fully striped front, and the three levels below build on each other, so you can stop at whichever one suits the notebook.
Check the cover material first
Tape needs a smooth, dry, slightly absorbent surface to grip. Run a thumb over the cover before you start.
- Works well: plain cardboard, kraft board, uncoated cardstock covers.
- Works poorly: glossy laminated or plastic-coated covers, fabric and linen-look covers, soft-touch coatings and anything with a deep embossed texture.
If you are unsure, press a short strip onto the back cover, burnish it and leave it overnight. If the ends have curled by morning, that cover will keep shedding tape no matter how carefully you apply it.
Wipe the cover with a dry cloth before you start.
Tape, tools and materials
- Two or three 15 mm rolls that look good together, plus one slim roll if you have it
- Scissors, a ruler and a pencil
- A craft knife and self-healing cutting mat for the diagonal block (adult hands only)
- A sheet of plain or patterned paper and a glue stick for the full cover
- A small piece of white or cream cardstock for a label
Level one: a spine strip and one corner
This is the fastest version and the one to try on a notebook you are not sure about.
- Cut a strip about 1 in (2.5 cm) longer than the spine.
- Close the notebook. Center the strip on the spine so half its width sits on the front cover and half on the back, and smooth it down from the middle toward both ends.
- Open the cover and fold the extra at the top and bottom to the inside. On a stitched or stapled notebook, snip the overhang at the fold so each half turns in separately.
- For the corner, lay two short strips across the lower outer corner of the front cover at about 45 degrees, parallel and a tape-width apart. Let them overhang, then fold the ends to the inside.
Tip
Open and close the notebook once before burnishing the spine strip. If the tape tightens or buckles at the hinge, lift it and lay it again with the cover slightly open.
Level two: a diagonal stripe block
A triangle of stripes across the lower corner looks deliberate and leaves most of the cover plain.
- With a pencil and ruler, draw a light diagonal line across the lower outer corner of the front cover. Starting about 3 in (7.5 cm) up the outer edge and ending the same distance along the bottom gives a balanced triangle on a pocket-size notebook; go larger on a bigger one.
- Lay the first strip so one edge sits just over the pencil line, covering it. Let both ends hang past the cover edges.
- Add strips toward the corner, each butted against or barely overlapping the last, alternating your tapes. The strips get shorter as you go.
- Burnish, then finish the edges. Either fold every end to the inside, or open the cover flat on a cutting mat, tape side down, and trim along the cover edge with a craft knife.
Folded ends last longer than trimmed ones, because a flush-cut end sits exactly where fingers and bag linings rub. Trimming gives the cleaner look on a notebook that stays on a desk.
Level three: full-cover stripes with a lined inside
Covering the whole front takes more tape and more patience, but the method is only one move repeated.
- Decide on horizontal stripes. They run with the short dimension of most notebooks, which means shorter strips that are easier to keep straight.
- Cut each strip about 1 in (2.5 cm) longer than the cover is wide. That leaves roughly 1/2 in (1.3 cm) to wrap inside at the outer edge.
- Start the first strip at the spine, level with the top edge of the cover, and smooth it toward the outer edge. Check it against the top edge: if the first strip is straight, the rest follow it.
- Lay the next strip against the first, overlapping by about a millimeter. Repeat down the cover.
- Open the cover. Fold each overhanging end to the inside one at a time and press it flat.
- Let the top and bottom strips overhang the cover edge slightly, snip them at the outer corners, and fold those to the inside as well.

The inside of the cover now shows a row of tape ends. Cut a sheet of paper about 1/8 in (3 mm) smaller than the cover on the three open sides, coat the back with a glue stick right to the edges, and press it over the ends. It hides them and helps hold them down.
Stripes are only the starting point. Once the base is on, a slim tape along the seam between two wide strips adds depth; the guide to overlapping strips so layers look intentional explains which order to stack them in.
Add a blank panel for a title
Writing straight onto patterned tape is hard to read. Cut a rectangle of white or cream cardstock, about 1.5 x 3 in (4 x 7.5 cm), and round the corners with scissors. Stick it to the cover with a glue stick, then frame it with slim tape, using the same corner methods described for neat tape borders with mitered corners.
Protecting a notebook that travels
A taped cover that lives on a shelf needs nothing more. One that rides in a bag gets rubbed at every edge, and the ends are the first things to lift.
The optional fix is a layer of clear self-adhesive book-covering film, or strips of wide clear tape, laid over the finished cover and wrapped to the inside. Apply it slowly from the spine outward to push out air. Be aware that this step is not removable: the clear layer bonds to the tape and the cover, so the design stays for the life of the notebook. It resists scuffs and light splashes, but it does not make the notebook safe to get wet.
Offcuts from the cover are enough to make a matching cardstock bookmark for the same notebook.
Frequently asked questions
Will washi tape stay on a glossy notebook cover?
Usually not for long. Laminated, plastic-coated, fabric and heavily textured covers give the low-tack adhesive little to grip, so ends curl within days. Test a short strip on the back cover overnight. If you want to decorate a coated cover anyway, wrap every strip well to the inside and expect to press ends back down.
How much tape does a full notebook cover need?
Divide the cover height by the tape width to get the number of strips, then multiply by the cover width plus about an inch for wrapping. A pocket notebook needs around ten strips of 15 mm tape; a larger one needs more. Roll lengths vary, so check the label before starting with a part-used roll.
Can the tape be removed from the cover later?
From plain cardboard or kraft, often yes, if you peel slowly at a low angle. Some covers have a soft surface that lifts with the tape, so test a hidden spot first. Once you add a paper lining inside or a layer of clear film on top, treat the decoration as a lasting one.