Washi Tape Picture Frames: Cover a Frame or Tape One to the Wall
Two frame projects: cover a plain flat frame with tape and miter the corners, or build a frame from tape alone around a print held with mounting putty.

Tutorial at a glance
Materials
- A plain flat wooden or cardboard frame
- A lightweight paper print or photo
- Removable mounting putty
- A dry cloth
There are two quite different things called washi tape frames. One is a real picture frame with its face covered in tape. The other has no frame at all: it is an outline of tape stuck to a wall or door around a print. The first is a small tabletop project; the second is a way to display paper without nails or glass.
Both are covered here, starting with the covered frame.
Which frames take tape well
Tape needs a flat, smooth face to lie on. Good candidates are plain flat-profile wooden frames, raw or lightly finished, and cardboard or pressed-board craft frames. A face between 3/4 and 1 1/2 in (2 to 4 cm) wide is comfortable to work on.
Poor candidates are frames with deep moldings, carved or beaded profiles, rough-sawn wood, and thick glossy varnish. On curves and grooves the tape bridges the hollows and lifts; on high gloss it can slide off with handling. Dusty raw wood also holds badly, so wipe it first.
Materials and preparation
- A flat frame, with the glass, backing board and any hanging hardware removed
- One or two rolls of 15 mm washi tape, or a wide roll of 20 to 30 mm
- Scissors, a craft knife, a metal ruler and a self-healing cutting mat
- A dry cloth
Wipe the frame free of dust and let any dampness dry off. Decide which way the strips run. Lengthwise strips along each side give a classic frame look and need mitered corners. Short strips laid across the face, like rungs, are easier, need no miters and make the most of striped or mixed rolls.
Cover the frame one side at a time
These steps use lengthwise strips. A craft knife is involved, so this part is for adult hands.
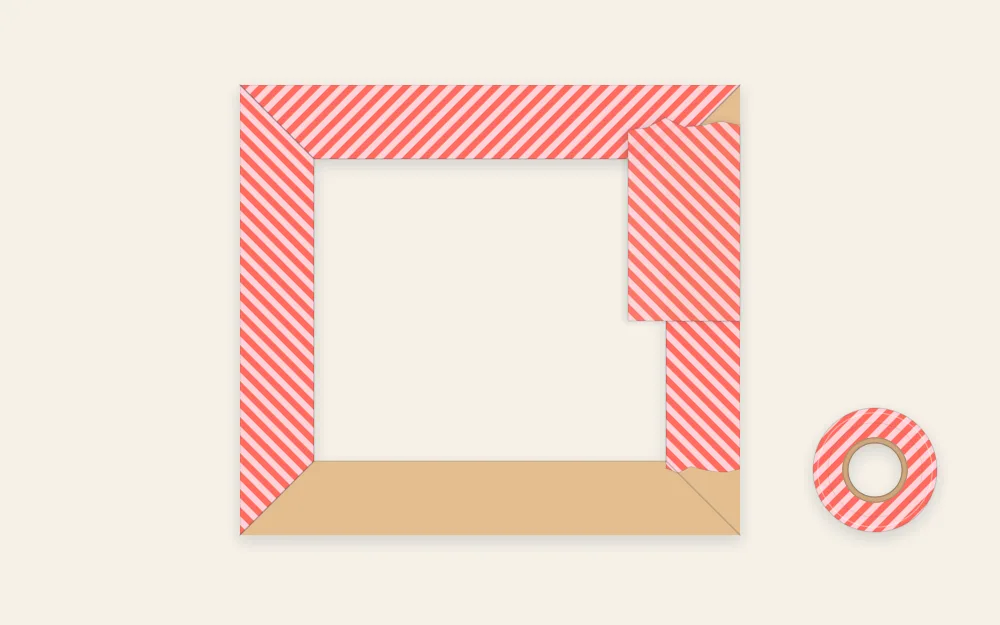
- Start with the top side. Cut a strip about 1 in (2.5 cm) longer than the side at each end.
- Lay the strip so it overhangs the outer edge of the frame by roughly half its width. Press it onto the face from the middle outward, then fold the overhang down over the outer edge and burnish it.
- Lay a second strip along the inner edge the same way, overhanging into the opening. If the two strips do not meet on the face, add a third down the middle, overlapping both slightly.
- At each inner corner, snip the overhanging tape diagonally into the corner, then fold it down onto the inside edge. Keep it out of the recess where the glass sits, or the glass may not seat properly.
- Repeat on the bottom side, then the two uprights. Let the strips of the uprights run over the ends of the top and bottom strips.
Miter the corners
At every corner there are now two layers of tape crossing. Lay the metal ruler from the inner corner of the opening to the outer corner of the frame. With light pressure, draw the knife along the ruler through both layers. Lift away the loose triangle on top, raise the upper strip a little, remove the triangle underneath, and press everything back down. The two strips now meet on a clean diagonal.
The cut is the same one used on a page border, and the walkthrough on neat mitered corners for tape borders goes through it slowly if you would like to practice on paper first.
Watch out
Press only hard enough to cut the tape. On a cardboard frame a heavy cut scores the board, and on soft wood it leaves a visible line if the tape is ever removed.
If a mitered corner does not appeal, leave the overlap square and cover each corner with a small square of contrasting tape instead.
Finish and reassemble
Burnish the whole face with the back of a spoon, paying attention to the edges and corners. Refit the glass, the picture and the backing board. Check the back: tape wrapped around the outer edge should stop short of the clips or tabs so they still close.
A covered frame is for dry indoor display. Dust it with a dry cloth, since washi tape is not waterproof and a wet wipe can loosen the edges. Stood on a shelf next to a few glass jars banded with the same tape, it makes a coordinated group from very little material.
A frame made only of tape
For the second project the tape goes directly onto a wall, a door or the side of a cabinet, and the print sits inside the outline. The tape does not hold the print. Washi does not carry weight, so fix the paper with small pieces of removable mounting putty at the corners and let the tape do the framing.
Painted walls, wallpaper and fresh or flaking paint all carry some risk with any tape. Test a hidden patch first and peel slowly at a low angle when the time comes; the full set of cautions is in the article on applying washi tape to walls and removing it.
- Hold the print in place and mark its four corners with faint pencil dots. Check the top pair with a small level.
- Decide on the margin. A gap of about 1/2 to 1 in (1.3 to 2.5 cm) between print and tape looks like a mat; no gap looks like a slim frame.
- Apply the top strip first, a little longer than needed, pressing from one end to the other without stretching.
- Add the two sides, then the bottom, overlapping at the corners.
- Trim the ends with scissors before pressing them down. Do not use a knife on the wall. For a mitered look, fold the end of each strip under itself at 45 degrees.
- Mount the print with putty and erase any pencil dots that still show.
Single, double and corner-only styles
| Style | How it is built | Suits |
|---|---|---|
| Single line | One 15 mm strip on each side | Small prints, postcards, a row of several |
| Double line | A 15 mm outer line and a slim inner line with a narrow gap between | One larger print that needs more presence |
| Corner-only | Two short strips forming an L at each corner, each leg about 2 in (5 cm) | Art that changes often, such as children’s drawings |
Small squares of a second tape set over the corners hide the joins on any of the three.

For a group of frames, cut a paper spacer and use it between every pair so the gaps stay equal.
Frequently asked questions
Will washi tape stick to a wooden picture frame?
It holds on smooth, flat wood that is raw or lightly finished, provided the surface is clean and dry. It struggles on rough grain, deep moldings and thick glossy varnish. Wrapping each strip over the edges of the frame and burnishing firmly gives it more to grip than a strip trimmed flush.
Can a tape frame on the wall hold a photo by itself?
Not reliably. Washi tape has a low-tack adhesive and is not made to carry weight, so a print held only by its taped edges tends to slip or curl. Fix the print with small pieces of removable mounting putty and treat the tape as the decorative outline around it.
Do the corners have to be mitered?
No. A simple square overlap is quicker and looks fine with solid tapes, and a small square of contrasting tape over each corner hides the join completely. Mitering matters most with stripes and directional patterns, where a diagonal join lets the pattern turn the corner cleanly.